This is my favorite of the hats I've made. The pattern is really easy and it is worked in sc and hdc so it goes really fast. I have used ww to bulky yarns with the same hook and it has worked out just fine. The hats made with the bulky yarn are slightly bigger, but definitely not too big for a normal sized head.
(This pattern is available for FREE for personal use only!) Hook Size: 6.00 mm (J) Yarns Used: Pink Hat (shown above): Lion Brand Wool-Ease Solids & Heathers, Dark Rose Heather, 1 skein
Blue Hat (immediately below): Patons Divine, 1.5 skeins Brown Hat (bottom): Jo-Ann Sensations, <1>Work from top down in a spiral, placing marker in the last stitch of each round.
Ch 30, sl st in first ch to form a ring (be careful not to twist the chain). Rnd 1: ch2 (counts as first hdc), hdc in each ch around Rnd 2: 2 hdc in each st around Rnd 3-7: 1 sc in each st around Rnd 8: *2 sc in next st, sc in each of next 19 sts* around Rnd 9: *2sc in next st, sc in each of next 20 sts* around Rnd 10: *2sc in next st, sc in each of next 21 sts* around Rnd 11: *2sc in next st, sc in each of next 22 sts* around (skip this round for a smaller hat) Hdc in each sc around until hat reaches desired length.
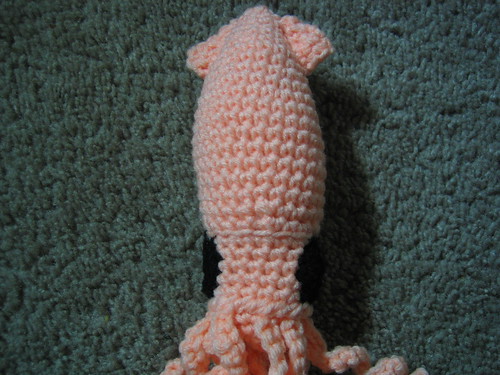
This is my very first original amigurumi pattern! It is very simple and quick to make. It is the first pattern that I have shared so please let me know if you find any mistakes.
(This pattern is available for FREE for personal use only!)
(Note: this pattern is worked in the round in spirals, place marker in the last stitch of each round.)
Materials : Lion Brand MicroSpun, 4.00mm hook (blue) Red Heart Worsted Weight, 6.00 mm hook (pink)
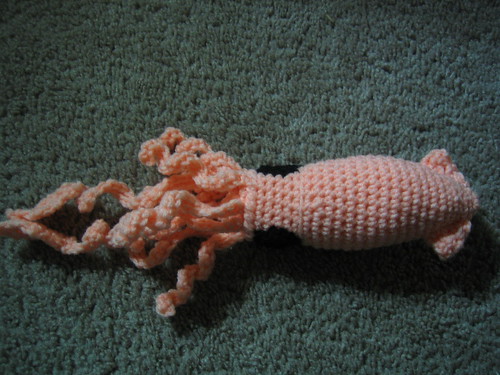
Gauge: There is no gauge for this project. Using a thicker yarn and a bigger hook, you can make a bigger squid.
Body: Rnd 1: ch 2, 4 sc into 2nd ch fr hook, pm (4sc) Rnd 2: *2sc* around (8sc) Rnd 3: *sc* around Rnd 4: *2sc in next st, sc in next st* around (12 sc) Rnd 5: rpt rnd 3 Rnd 6: *2sc in next st, sc in next 2 sts* around (16sc) Rnd 7: rpt rnd 3 Rnd 8: *2sc in next st, sc in next 3 sts* around (20sc) Rnd 9: rpt rnd 3 Rnd 10: *2sc in next st, sc in next 4 sts* around (24sc) Rnd 11: rpt rnd 3 Rnd 12: *2sc in next st, sc in next 5 sts* around (28sc) Rnd 13-17: rpt rnd 3 Rnd 18: *dec, sc in next 12 st* around (26sc) Rnd 19: rpt rnd 3 Rnd 20: sc in next 6 sts, dec, sc in next 10 sts, dec, sc in next 6 sts (24sc) Rnd 21: *dec, sc in next 4 sts* around (20sc) Rnd 22: in BLO, *sc* around (20sc) Rnd 23-26: rpt rnd 3 sl st in next st, fasten off, weave in loose ends.
Bottom of Body (this is what the legs will attach to): Rnd 1: ch 2, 4sc into 2nd ch fr hook, pm (4sc) Rnd2: *2sc* around (8sc) Rnd 3: *2sc in next st, sc in next st* around (12sc) Rnd 4: *2sc in next st, sc in next 2 sts* around (16sc) Rnd 5: *2sc in next st, sc in next 3 sts* around (20sc) sl st in next st, fasten off, weave in loose ends.
Long Tentacles (Make 2): ch 31, sc in 2nd ch fr hook, sc to end of row (30 sc) ch 1, sc into the side of the row, ch1, turn 2sc into first sc, ch 1, turn 2sc into each of next to sts, ch1, turn 2sc in first st, sc in next 2 sts, 2sc in last st, ch 1, turn dec, sc in next 2 sts, dec, ch 1, turn dec twice, ch 1, turn dec, ch 1, sc into dec, fasten off. weave in loose ends.Legs (Make 8): ch 21, sc in 2nd ch fr hook, sc across, fasten off. Leave a long tail for sewing.
Fins (Make 2): Row 1: ch 7, sc in 2nd ch fr hook, sc across, ch1, turn (6sc) Row 2: dec, sc in next 2 sc, dec, ch 1, turn (4sc) Row 3: dec twice, ch 1, turn (2sc) Row 4: dec, fasten off
Eyes (Contrasting Color, Make 2): Rnd 1: ch 2, 4sc into 2nd ch fr hook, pm (4sc) Rnd 2: *2sc* around (8sc) Rnd 3: *2sc in next st, sc in next st* around (12sc) sl st in next st, fasten off, leave a long tail for sewing.
Assembly (Use photos as a guide for sewing): Fold fins in half and sew to body. Sew eyes to body. Sew legs and tentacles to bottom. Stuff body and sew bottom to body.
 This is my favorite of the hats I've made. The pattern is really easy and it is worked in sc and hdc so it goes really fast. I have used ww to bulky yarns with the same hook and it has worked out just fine. The hats made with the bulky yarn are slightly bigger, but definitely not too big for a normal sized head.